I Built a Python WhatsApp Bot to Keep Me Sane During Quarantine

This pandemic has taken a huge toll on my mental and emotional health. In order to keep me occupied and brighten up the lives of those around me, I started on yet another Python project — this time, a WhatsApp bot that sends me random cat pictures, trending memes, the best cooking recipes, and of course, the latest world news and COVID19 statistics.
The full project can be found on my GitHub repository, and my webhook is live on https://zeyu2001.pythonanywhere.com/bot/.
Prerequisites
We will be using Python, the Django web framework, ngrok and Twilio to create this chatbot. I will show you how to install the required packages, but you need to have Python (3.6 or newer) and a smartphone with an active phone number and WhatsApp installed.
Following Python best practices, we will create a virtual environment for our project, and install the required packages.
First, create the project directory.
$ mkdir whatsapp-bot
$ cd whatsapp-bot
Now, create a virtual environment and install the required packages.
For macOS and Unix systems:
$ python3 -m venv whatsapp-bot-venv
$ source whatsapp-bot-venv/bin/activate
(whatsapp-bot-venv) $ pip install twilio django requests
For Windows:
$ python3 -m venv whatsapp-bot-venv
$ whatsapp-bot-venv\Scripts\activate
(whatsapp-bot-venv) $ pip install twilio django requests
Configuring Twilio
You will need a free Twilio account, which allows you to use a Twilio number as your WhatsApp bot. A free account comes with a trial balance that will be enough to send and receive messages for weeks to come. If you wish to continue using your bot after your trial balance is up, you can top up your account.
You won’t be able to use your own number unless you obtain permission from WhatsApp, but the Twilio number would be good enough for this project. You will need to set up your Twilio sandbox here by sending a WhatsApp message to the Twilio number. This has to be done once and only once.

Setting Up Your Webhook
Twilio uses what is called a webhook to communicate with our application. Our chatbot application would need to define an endpoint to be configured as this webhook so that Twilio can communicate with our application.
Django is a web framework that allows us to do just that. Although the Django vs. Flask debate can go on for eternity, I chose to use Django simply because I have just started using it a few weeks ago and I wanted to get used to using it. You can use Flask to achieve the same thing, but the code would be different.
First, navigate to your whatsapp-bot directory and establish a Django project.
(whatsapp-bot-venv) $ django-admin startproject bot
This will auto-generate some files for your project skeleton:
bot/
    manage.py
    bot/
        __init__.py
        settings.py
        urls.py
        asgi.py
        wsgi.py
Now, navigate to the directory you just created (make sure you are in the same directory as manage.py) and create your app directory.
(whatsapp-bot-venv) $ python manage.py startapp bot_app
This will create the following:
bot_app/
    __init__.py
    admin.py
    apps.py
    migrations/
        __init__.py
    models.py
    tests.py
    views.py
For the sake of this chatbot alone, we won’t need most of these files. They will only be relevant if you decide to expand your project into a full website.
What we need to do is to define a webhook for Twilio. Your views.py file processes HTTP requests and responses for your web application. Twilio will send a POST request to your specified URL, which will map to a view function, which will return a response to Twilio.
from twilio.twiml.messaging_response import MessagingResponse
from django.views.decorators.csrf import csrf_exempt

@csrf_exempt
def index(request):
    if request.method == 'POST':
        # retrieve incoming message from POST request in lowercase
        incoming_msg = request.POST['Body'].lower()

        # create Twilio XML response
        resp = MessagingResponse()
        msg = resp.message()
This creates an index view, which will process the Twilio POST requests. We retrieve the message sent by the user to the chatbot and turn it into lowercase so that we do not need to worry about whether the user capitalizes his message.
Twilio expects a TwiML (an XML-based language) response from our webhook. MessagingResponse() creates a response object for this purpose.
resp = MessagingResponse()
msg = resp.message()
msg.body('My Response')
msg.media('https://example.com/path/image.jpg')
Doing this would create a response consisting of both text and media. Note that the media has to be in the form of a URL, and must be publicly accessible.
from twilio.twiml.messaging_response import MessagingResponse
from django.views.decorators.csrf import csrf_exempt
from django.http import HttpResponse

@csrf_exempt
def index(request):
    if request.method == 'POST':
        # retrieve incoming message from POST request in lowercase
        incoming_msg = request.POST['Body'].lower()

        # create Twilio XML response
        resp = MessagingResponse()
        msg = resp.message()

        if incoming_msg == 'hello':
            response = "*Hi! I am the Quarantine Bot*"
            msg.body(response)

        return HttpResponse(str(resp))
With this knowledge, we can now return a HttpResponse that tells Twilio to send the message “Hi! I am the Quarantine Bot” back to the user. The asterisks (*) are for text formatting — WhatsApp will bold our message.
This won’t work unless we link it to a URL. In the bot_app directory, create a file urls.py. Include the following code:
from django.urls import path
from . import views

urlpatterns = [
    path('', views.index, name='index'),
]
Now, we need the root URLconf to point to our bot_app/urls.py. In bot/urls.py, add the following code:
from django.contrib import admin
from django.urls import include, path

urlpatterns = [
    path('bot/', include('bot_app.urls')),
    path('admin/', admin.site.urls),
]
The include() function allows referencing other URLconfs. Whenever Django encounters include(), it chops off whatever part of the URL matched up to that point and sends the remaining string to the included URLconf for further processing.
When Twilio sends a POST request to bot/, it will reference bot_app.urls, which references views.index, where the request will be processed.
Testing It Works
Make sure you are in the directory with manage.py, and run
(whatsapp-bot-venv) $ python manage.py runserver

You should see the port that your Django application is running on. In this screenshot, it is port 8000. But this is still running from your computer. To make this service reachable from the Internet we need to use ngrok.
Open a second terminal window, and run
$ ngrok http 8000

The lines beginning with forwarding tell you the public URL ngrok uses to redirect requests to your computer. In this screenshot, https://c21d2af6.ngrok.io is redirecting requests to my computer on port 8000. Copy this URL, and go back to your Twilio console.
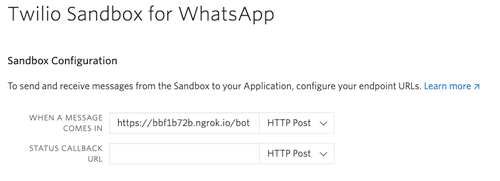
Paste the URL into the “When a message comes in” field. Set the request method to HTTP post.
If you want to use my app, use https://zeyu2001.pythonanywhere.com/bot/ instead for the “When a message comes in” field.
In your settings.py, you also need to add your ngrok URL as one of the ALLOWED_HOSTS.
Now you can start sending messages to the chatbot from your smartphone that you connected to the sandbox at the start of this tutorial. Try sending ‘hello’.
Adding Third-Party APIs
In order to accomplish most of our features, we have to use third-party APIs. For instance, I used Dog CEO’s Dog API to get a random dog image every time the user sends the word ‘dog’.
import requests

...

elif incoming_msg == 'dog':
    # return a dog pic
    r = requests.get('https://dog.ceo/api/breeds/image/random')
    data = r.json()
    msg.media(data['message'])

...
requests.get(url) sends a GET request to the specified URL and returns the response. Since the response is in JSON, we can use r.json() to convert it into a Python dictionary. We then use msg.media() to add the dog picture to the response.
My Final Code
My final chatbot includes the following features:
- Random cat image
- Random dog image
- Random motivational quote
- Fetching recipes from Allrecipes
- Latest world news from various sources
- Latest COVID19 statistics for each country
- Trending memes from r/memes subreddit
Deploying Your Webhook
Once you’re done coding, you probably want to deploy your webhook somewhere so that it runs 24/7. PythonAnywhere provides a free Django-friendly hosting service.
In order to deploy your project on PythonAnywhere, upload your project to GitHub and follow the documentation to set up your web app.
Once deployed, update your Twilio sandbox configuration so that the webhook is set to your new URL (such as https://zeyu2001.pythonanywhere.com/bot/).
Thanks for Reading!
Now you know how to set up your very own WhatsApp chatbot with Twilio. If you have any questions, please feel free to comment on this post.